docker pull httpd:alpine
docker pull httpd:latest
docker inspect --format='{{.Config.ExposedPorts}}' httpd:latest
docker inspect --format='{{.Config.ExposedPorts}}' httpd:alpine
docker run -d -p 80:80 --name httpd-latest httpd:latest
curl http://localhost:81
docker run -d -p 6574:80 --name httpd-alpine httpd:alpine
curl http://localhost:804 Dev-Ops for Data Scientists
Getting to Production
4.1 Data Science in Production
4.2 Data Science in Production
4.3 Getting to Production
You’ve written a kickass app! Now what?
4.4 💬 Discussion
How are we presenting our code?
What is the data architecture?
Where is it being deployed?
Is it secure and accessible?
Does it scale?
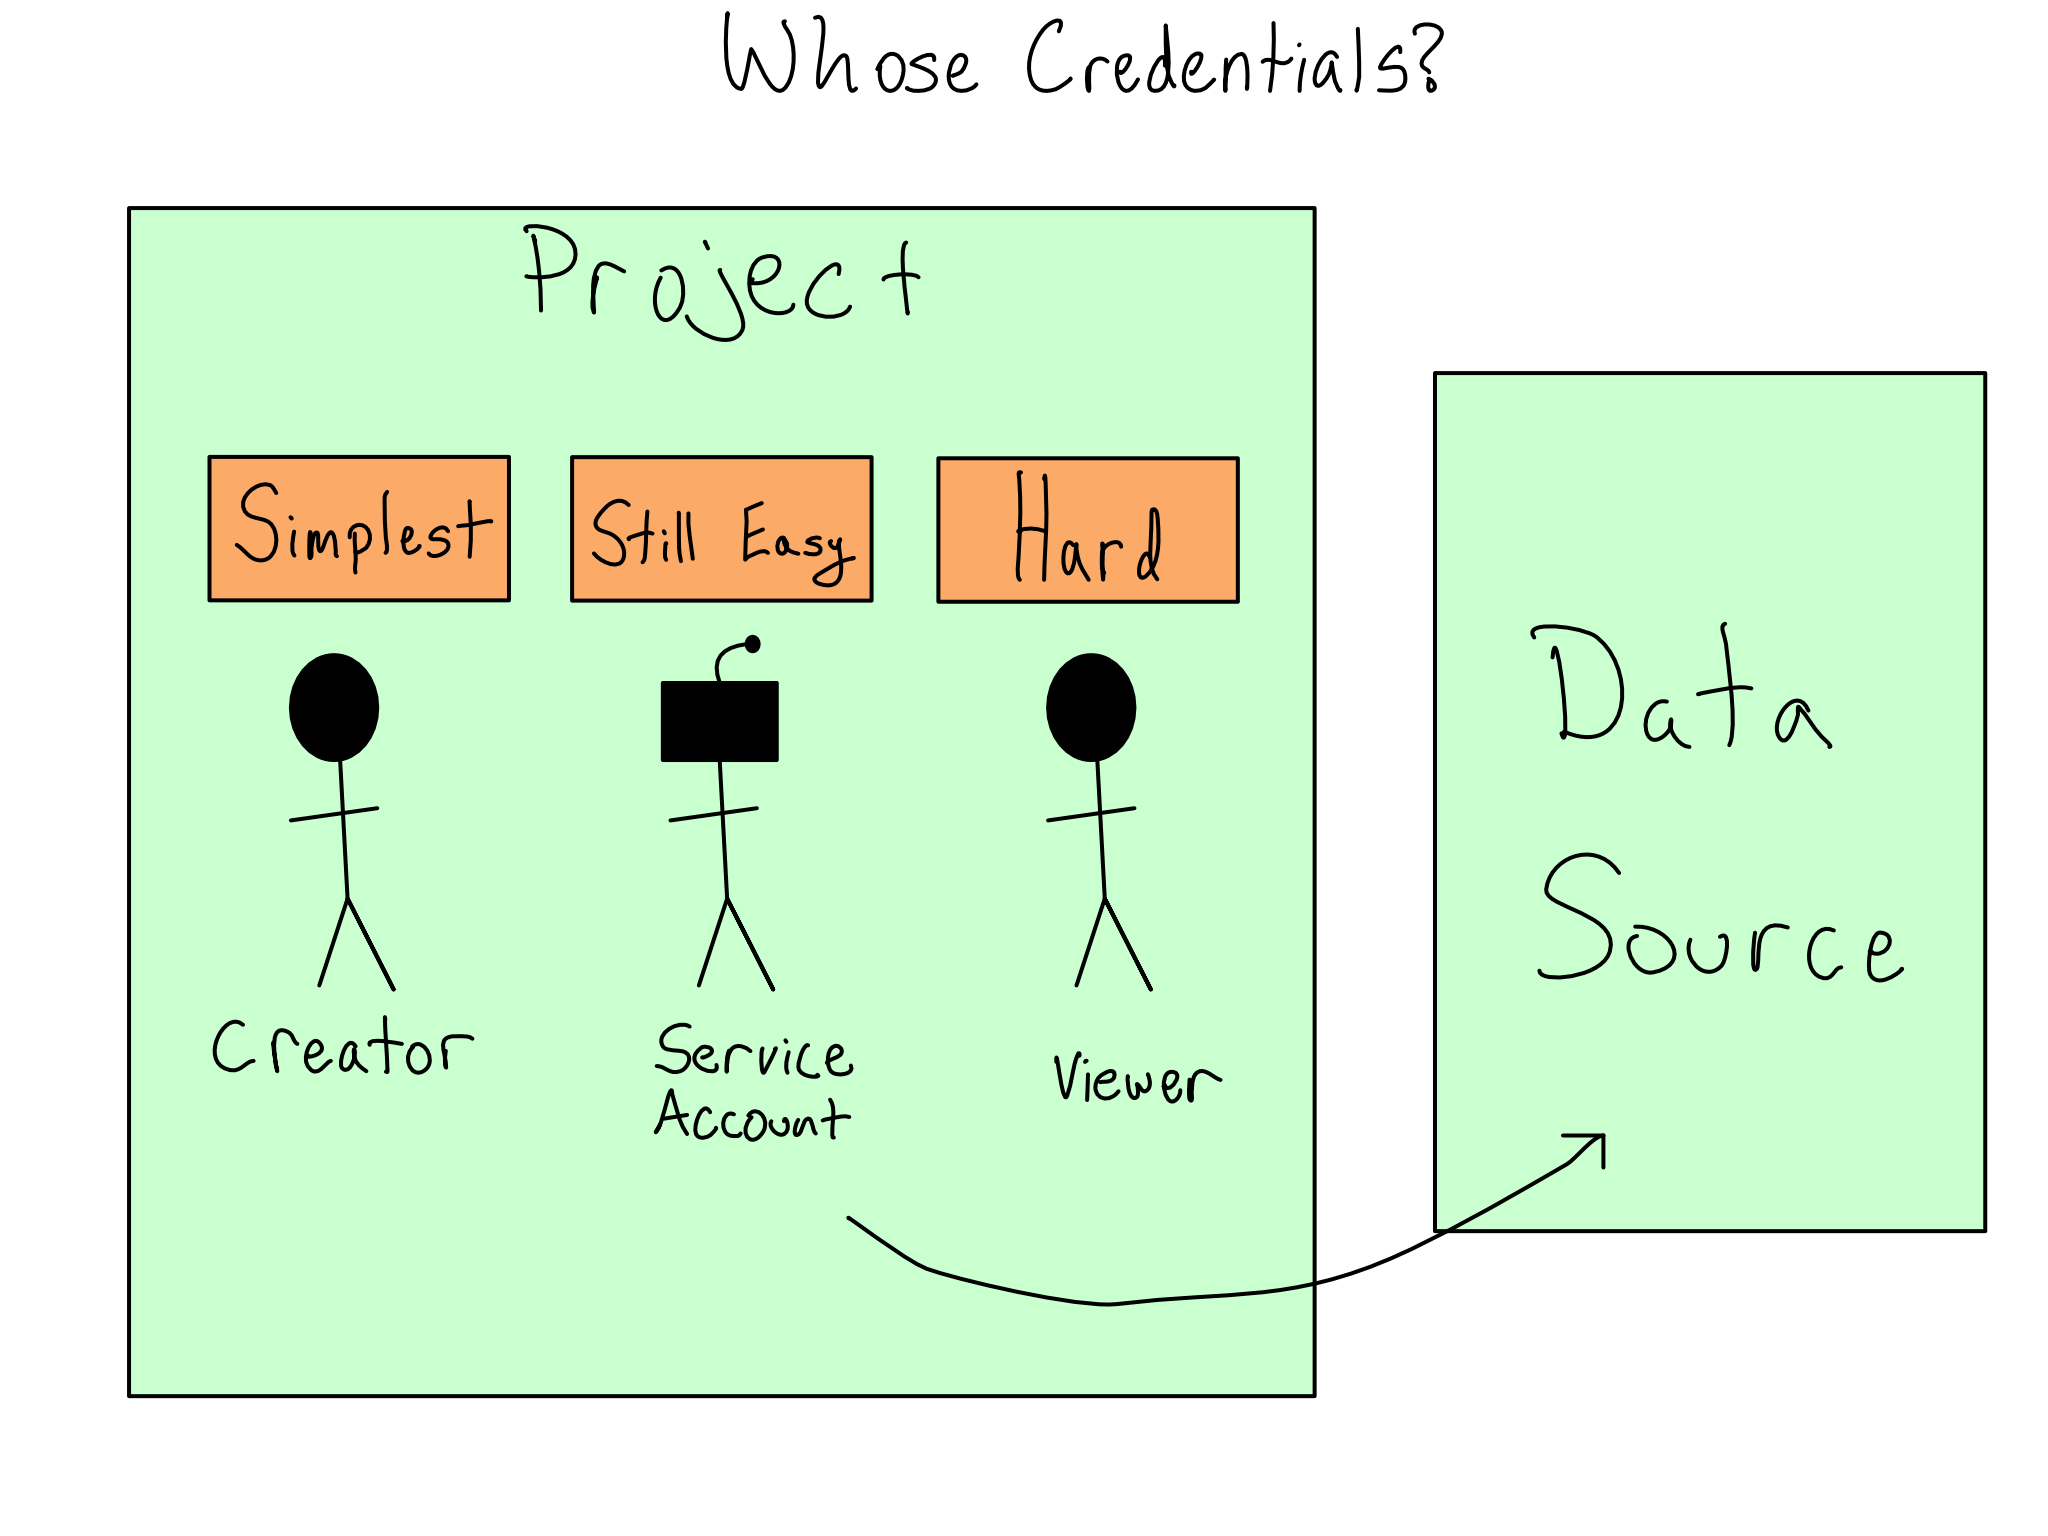
4.5 Think about data auth early!
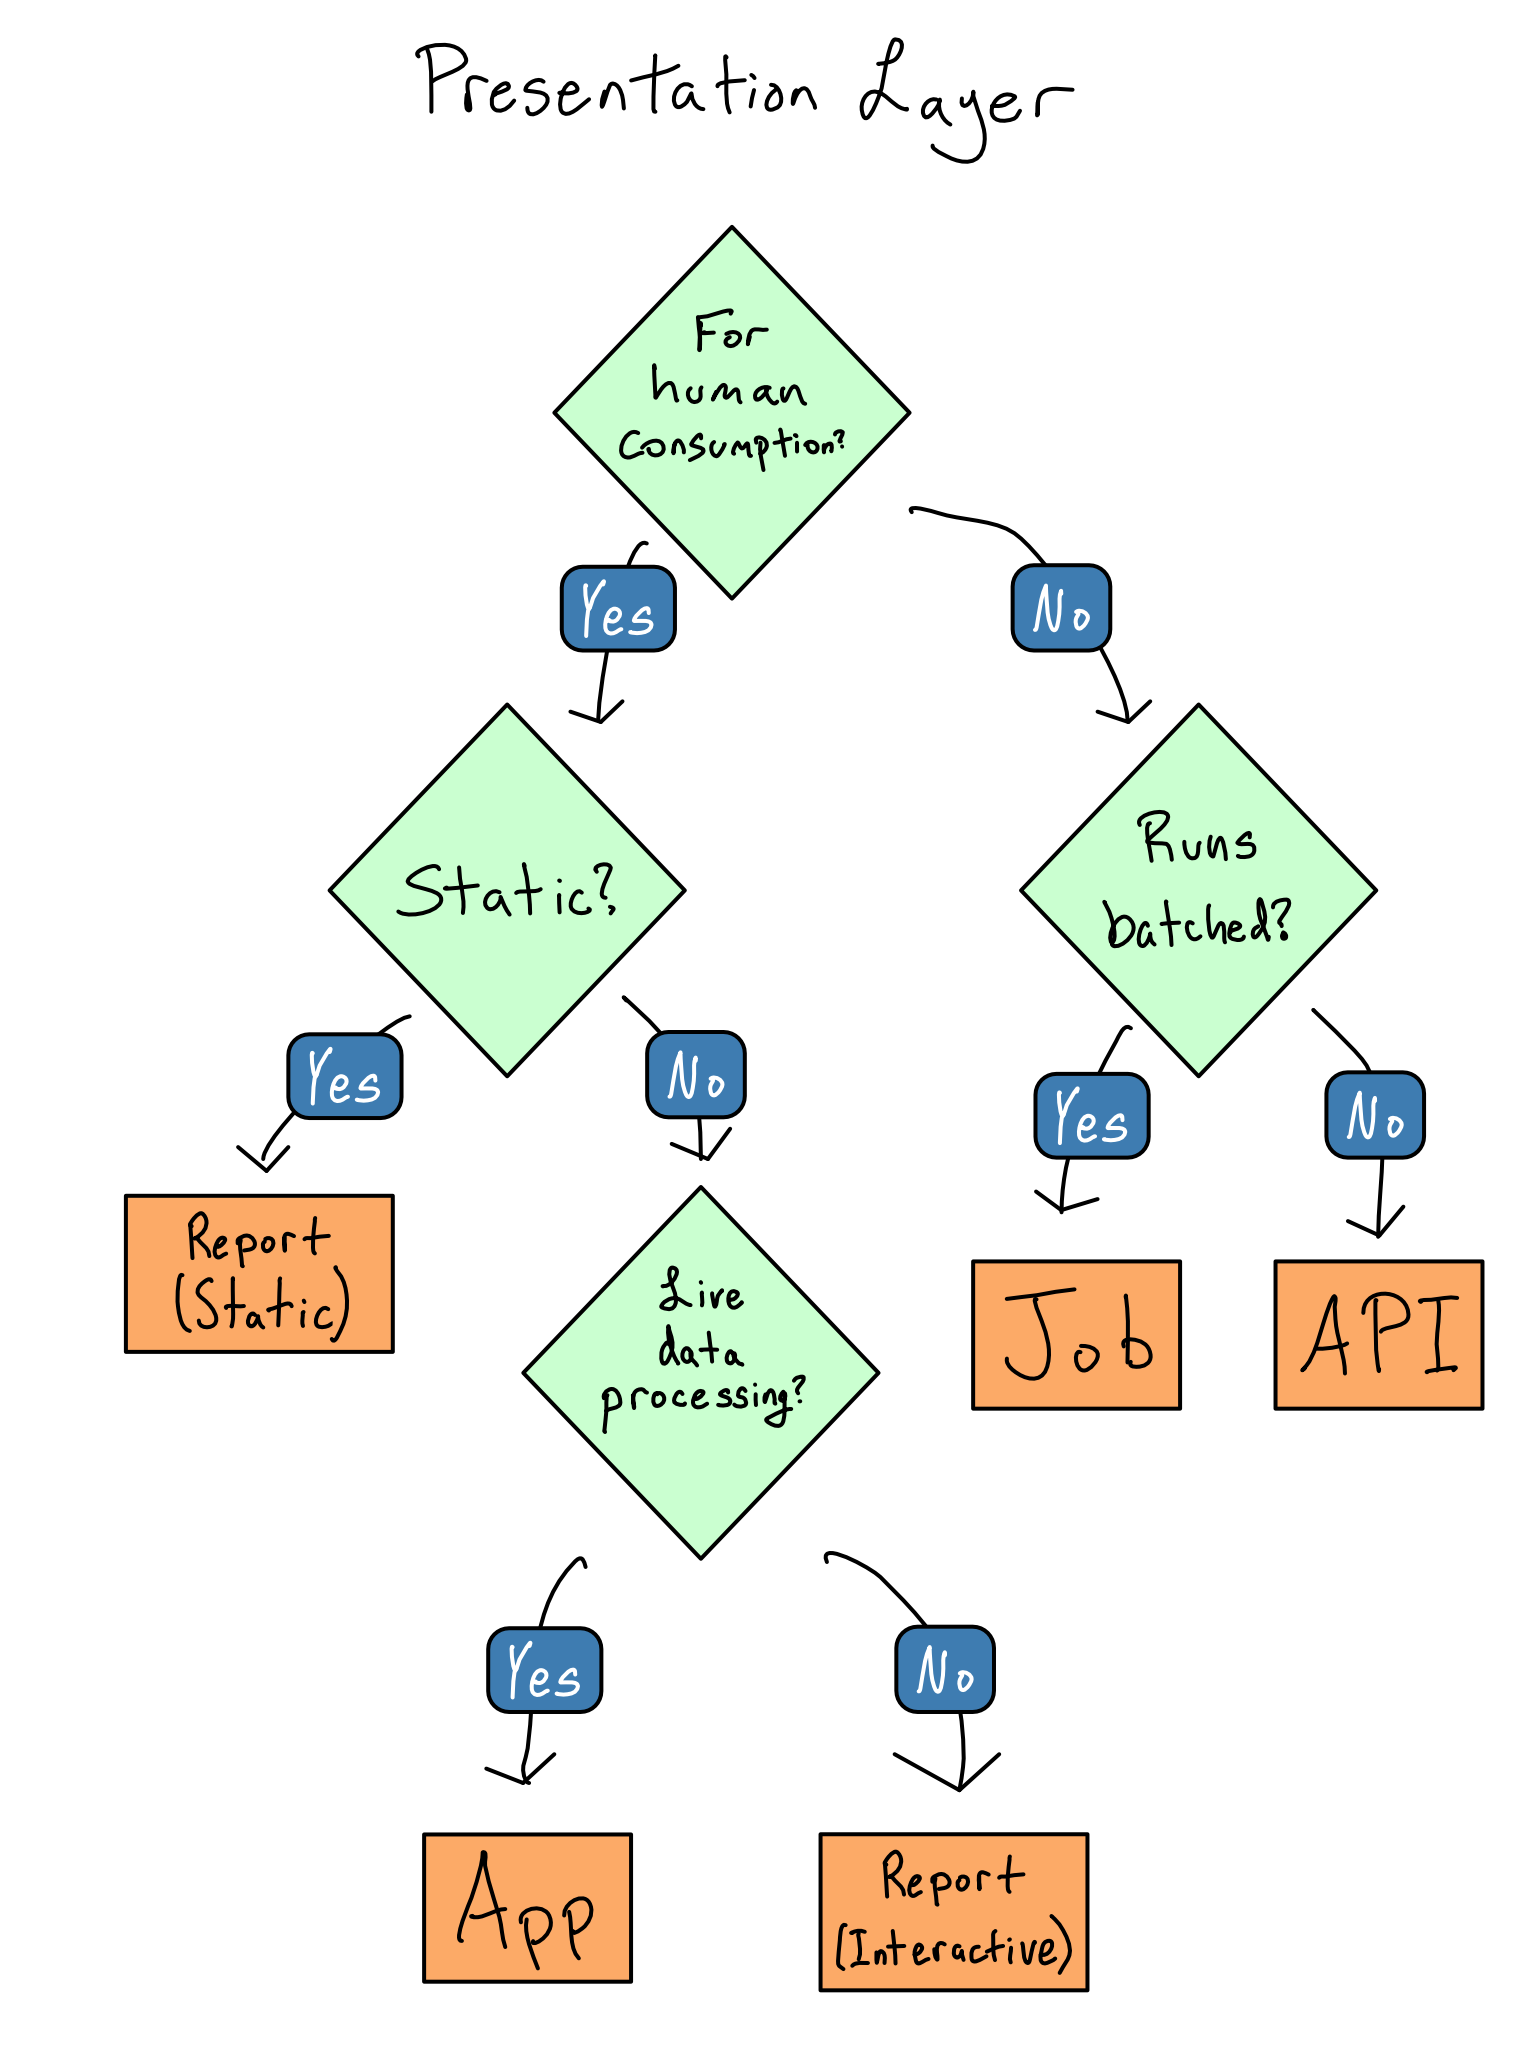
4.6 Choosing the right presentation layer
Presentation Layer 🖼️ – what the end users of the app directly interact with. It’s the displays, buttons, and functionality the user experiences.
Processing Layer ⚒️ – the processing that happens as a result of user interactions. Sometimes, it is called the business logic.
Data Layer 🛢️ – how and where the app stores and retrieves data.
4.7 Presentation Layer
4.8 What’s happening with the data?
Can you remove the data processing and storage from the presentation?
Can you pre-calculate anything?
Can you reduce data granularity?
When is data pulled in and refreshed?
4.9 Data Storage
| Location | Use case |
|---|---|
| With the code | Data is updated as often or less often than the app code and doesn’t need to be shared across projects |
| Database | Gold standard for data storage and access |
| Pins | Lightweight datasets, ephemeral data, models |
| Blob Storage | Gold standard for storing large amounts of unstructured data |
| In the server | Typically the method of last resort for unstructured data as it requires SSH access to the server for setup and often requires code changes between development and deployment, however for very large files, it may be the only option |
| API | Gold standard for data that requires long-running business logic, like training an ML model |
4.10 Choosing a REST API
standardized format for communication regardless of programming language
standardized documentation - swagger
packages in R (httr2) and Python (requests) for connecting
Smaller pieces are easier to manage - an API can make your code more modular
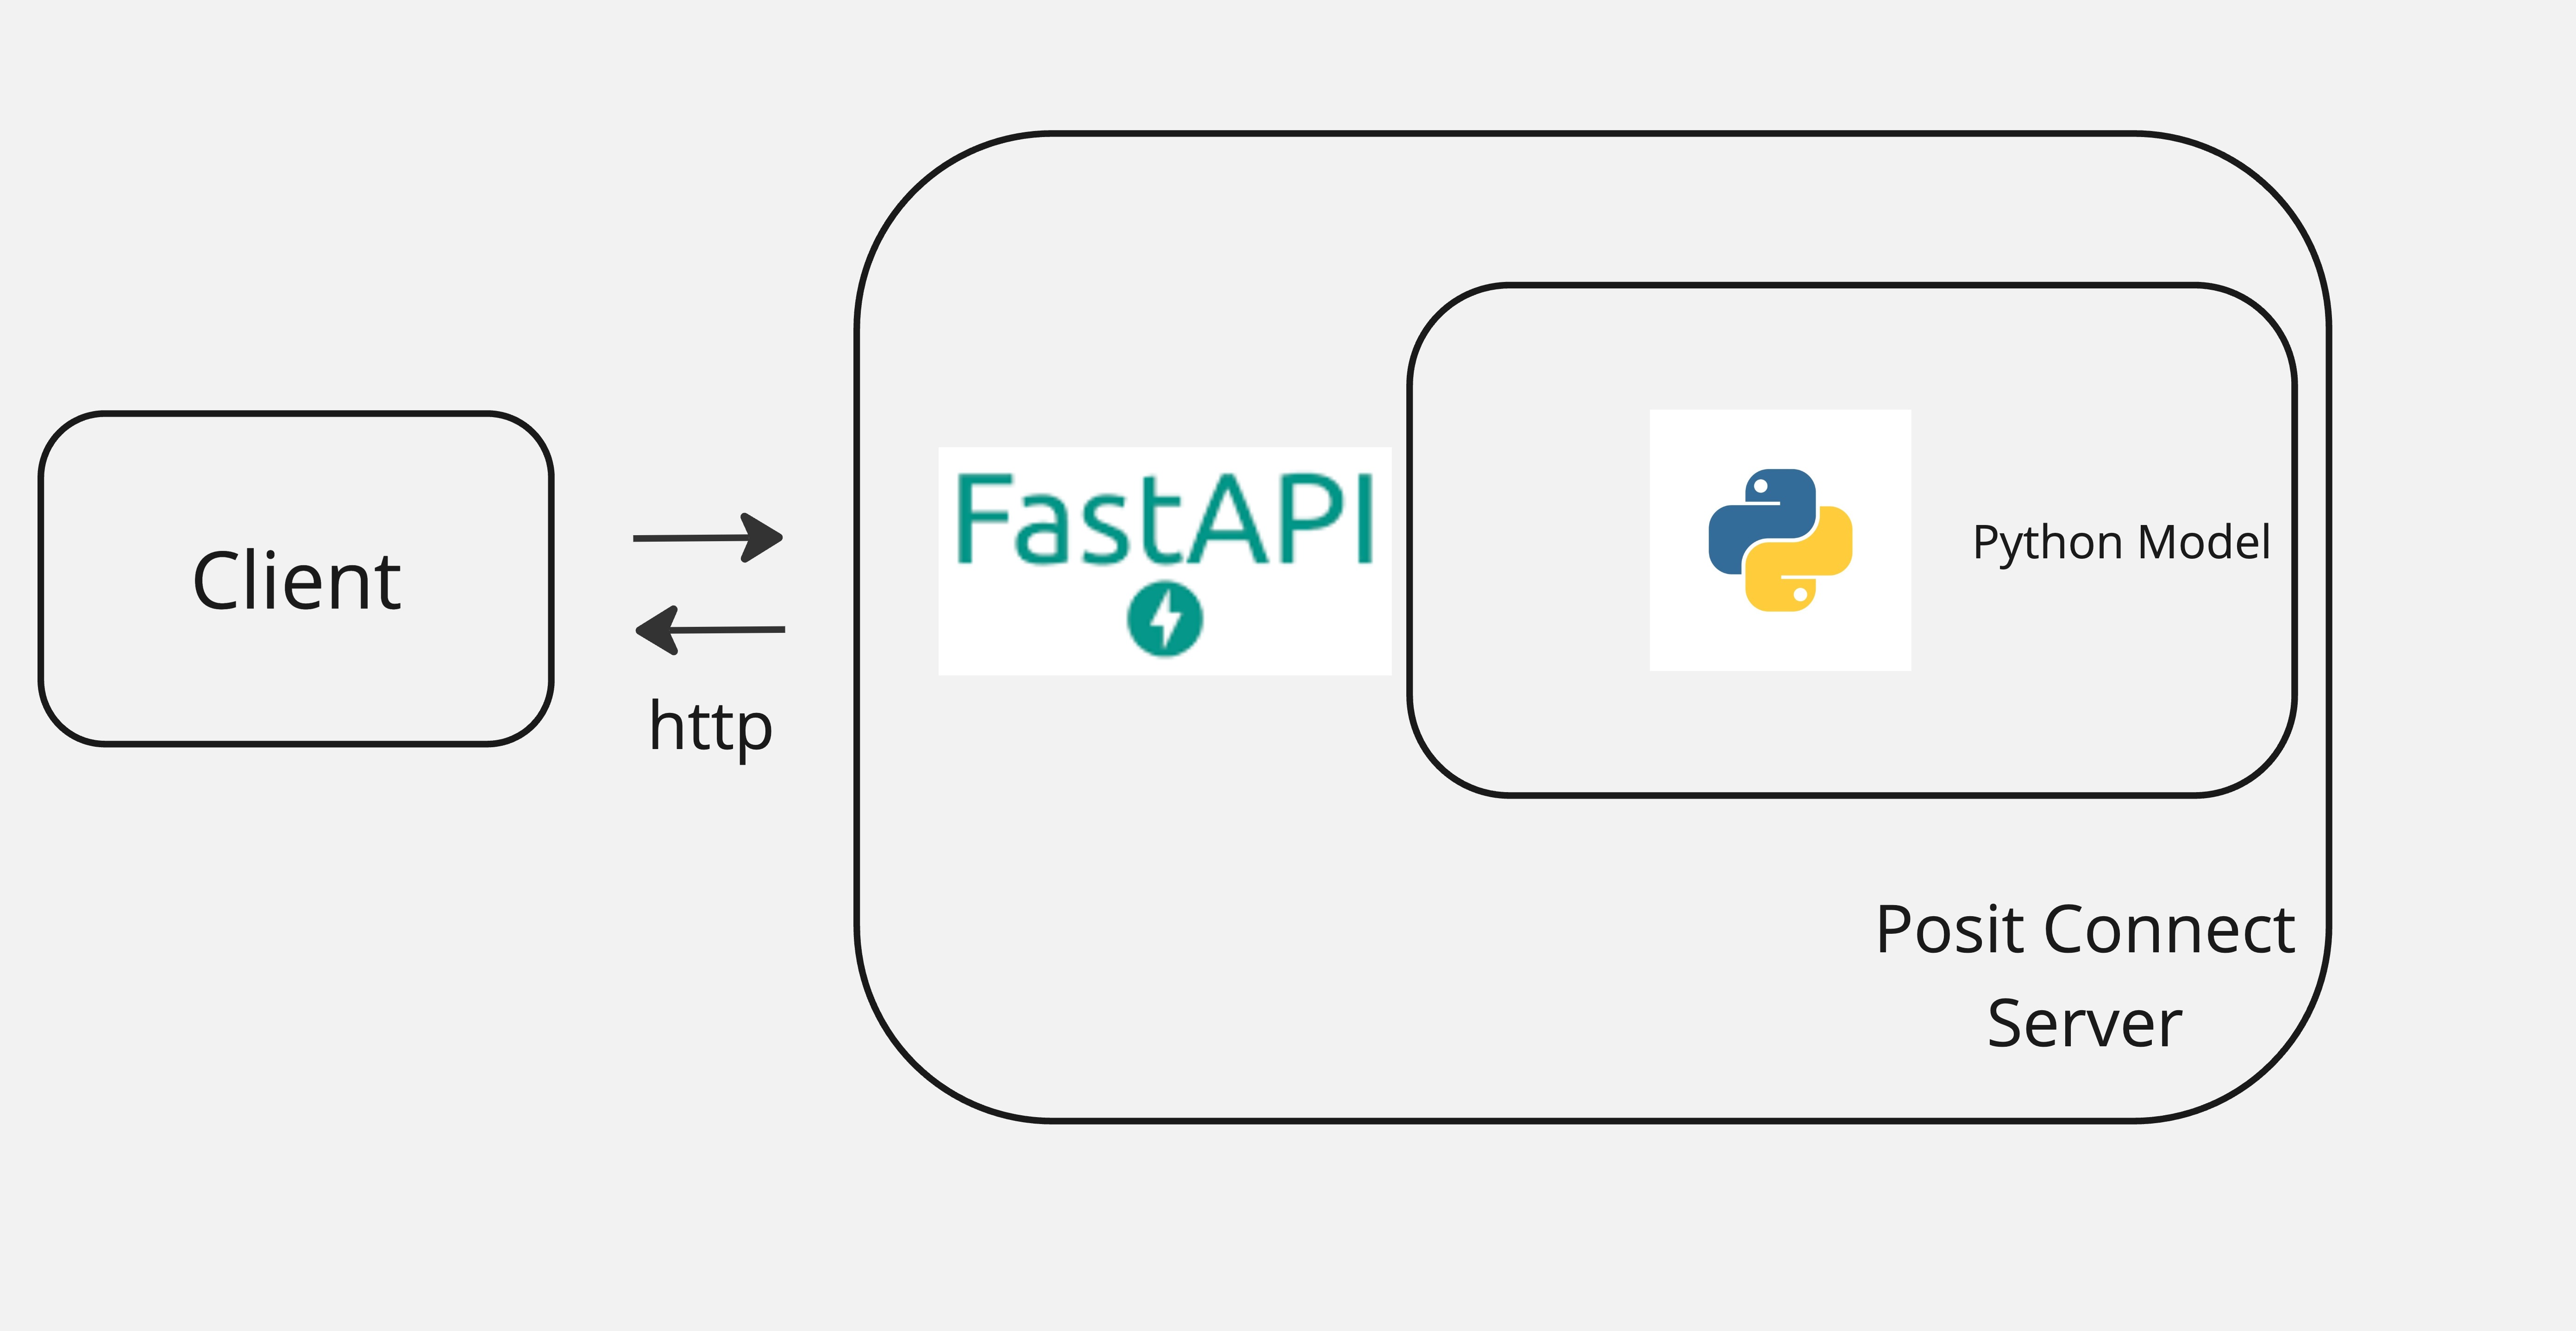
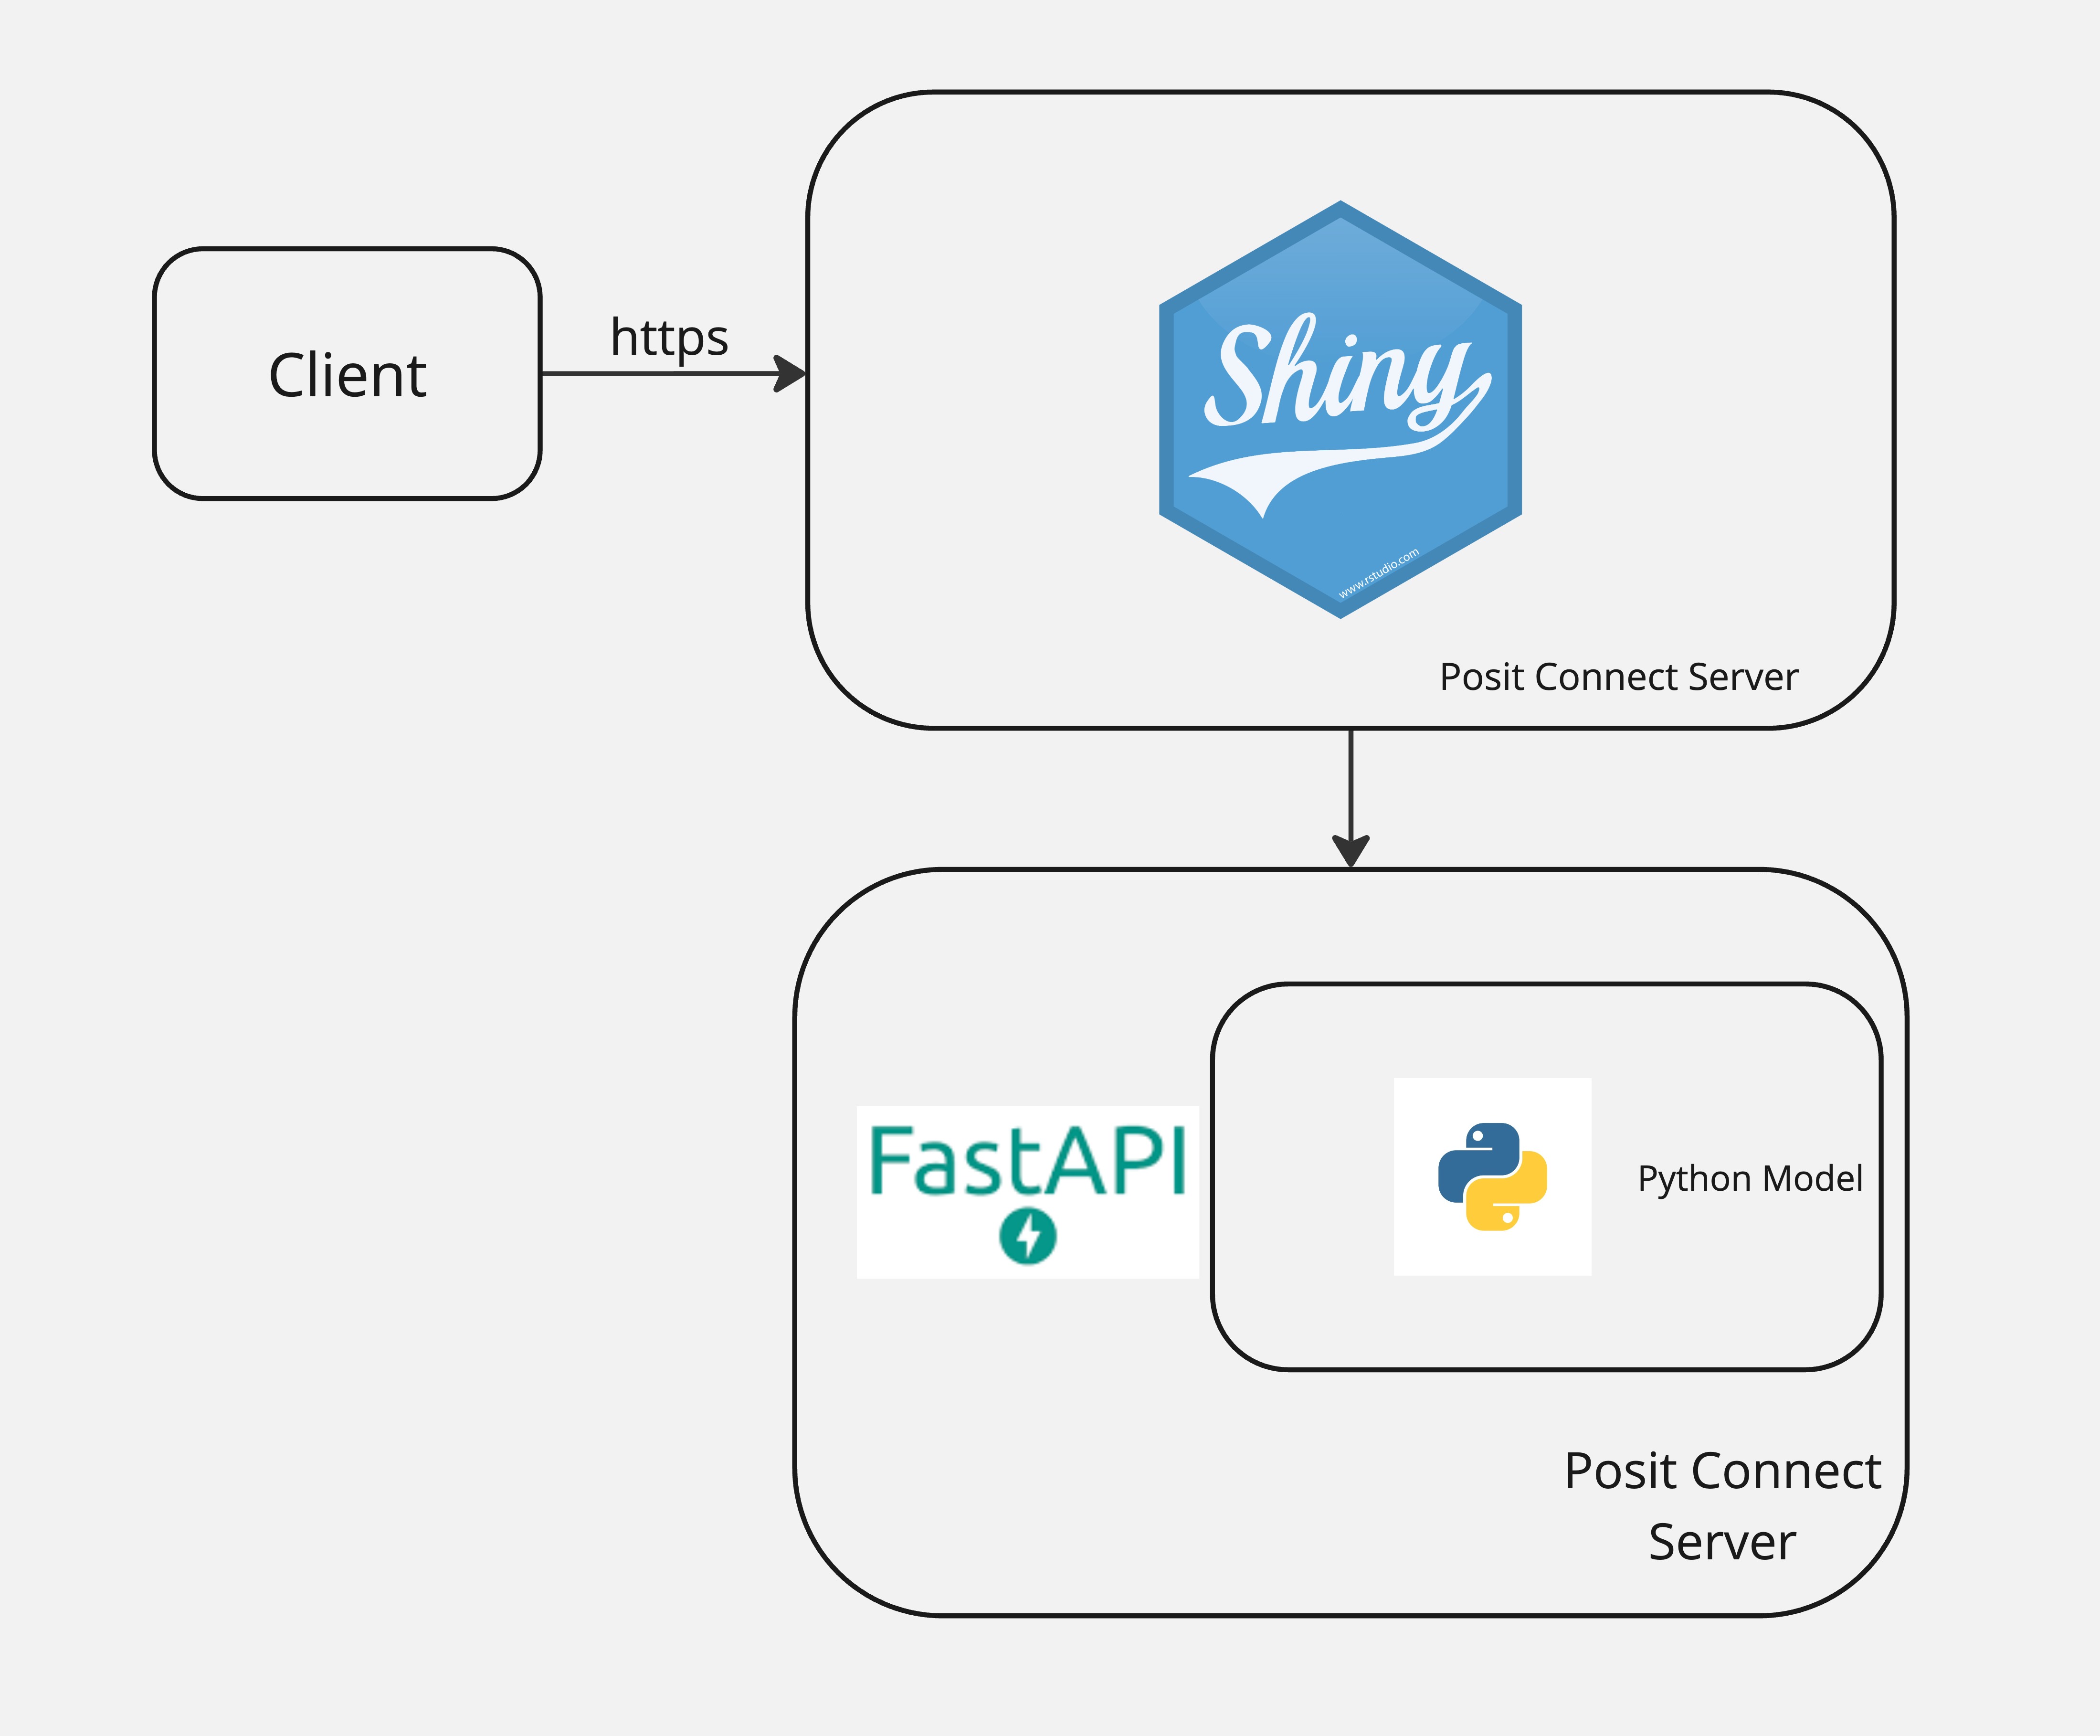
In the case of a general-purpose three-layer app, it is almost always the case that the middle tier will be an API. Separating processing logic into functions is often sufficient in a data science app. But, separating it into an API is often helpful if you’ve got a long-running bit of business logic, like training an ML model.
APIs are the standard way for two computer systems to communicate. API is a general term that describes machine-to-machine communication. For our purposes, we’re talking about http-based REST-ful APIs.
http operates on a request-response model. So when you use an API, you send a request to the API and it sends a response back.
4.11 How a REST API works
4.12 HTTP requests and responses
| Verb | Function |
|---|---|
| GET | retrieve data |
| POST | send some data and receive a response |
| PUT | send data to update existing thing |
| DELETE | delete something that exists |
4.13 Response Code
| Description | |
|---|---|
| 2xx | Request is successful! |
| 4xx | Client error. You may have done something wrong! |
| 5xx | Server error. |
4.14 Anatomy of an API
- Host (fixed):
http://api.hostname.io/
- Endpoint:
- Resource location (think of as a function)
http://api.hostname.io/end-point
- Parameters (optional):
- key-value pairs specify what you want URL to return
http://api.hostname.io/end-point/?param=value
- Headers & body (optional):
- metadata attached to HTTP request to a server or response from server
- Examples include auth credentials, type of data returned
You can think of an API as a “function as a service”. That is, an API is just one or more functions,
application programming interface clients to communicate with a server. Rest API is a kind of web-service which stores and retrieves necessary data. It provides great flexibility to developers since it does not need any dependent code libraries to access the web-services. Amongst the many protocols supported by REST, the most common one is HTTP. When a request is sent from the client using a HTTPRequest, a corresponding response is sent from the server using HTTPResponse.
4.15 ✏️ Your turn
4.16 Where to deploy our app?
cloud container deployment + registry
build your own
platform as a service
Cloud platform all in one
4.17 Things to consider when choosing a deployment framework
cost
how many apps to deploy? what kinds of apps?
who are users? do they need to login?
how secure does the data need to be? (and the server it resides in)
compute resources
integration with git and ci/cd
4.18 Posit Connect
4.19 Your turn
Activity 9: Create a fastAPI prediction model
4.20 Making Requests to your API
- curl
- R
- Python
- SDK?
4.21 curl
curl -X 'POST' \
  'https://granite-mole.fd049.fleeting.rstd.io/rsconnect/content/e444fd65-634f-4b6a-bc78-be70c790cc3f/predict' \
  -H 'accept: application/json' \
  -H 'Content-Type: application/json' \
  -H "Authorization: Key ${CONNECT_API_KEY}" \
  -d '{
  "species": "Adelie",
  "sex": "female",
  "bill_length_mm": 40.0
}'
4.22 R
library(httr2)

url <- "https://granite-mole.fd049.fleeting.rstd.io/rsconnect/content/e444fd65-634f-4b6a-bc78-be70c790cc3f/predict"
headers <- c(
  "accept" = "application/json",
  "Content-Type" = "application/json",
  "Authorization" = paste("Key", Sys.getenv("CONNECT_API_KEY"))
)
body <- list(
  species = "Adelie",
  sex = "female",
  bill_length_mm = 40.0
)

response <- request(url) %>%
  req_headers(headers) %>%
  req_body_json(body) %>%
  req_method("POST") %>%
  req_perform()

print(response)
4.23 Python
import requests
import os

url = 'https://granite-mole.fd049.fleeting.rstd.io/rsconnect/content/e444fd65-634f-4b6a-bc78-be70c790cc3f/predict'
headers = {
    'accept': 'application/json',
    'Content-Type': 'application/json',
    'Authorization': f'Key {os.getenv("CONNECT_API_KEY")}'
}
data = {
    "species": "Adelie",
    "sex": "female",
    "bill_length_mm": 40.0
}

response = requests.post(url, headers=headers, json=data)

print(response.json())
4.24 ✏️ Your turn
4.25 🔍 Deploy API in Docker
# Use the official Python base image
FROM python:3.11.4-slim

# Set the working directory
WORKDIR /app

# Copy the requirements file into the container
COPY requirements.txt .

# Install the required dependencies
RUN pip install --no-cache-dir -r requirements.txt

# Copy the entire project into the container
COPY . .

# Expose the port FastAPI will run on
EXPOSE 8000

# Run the FastAPI app with Uvicorn
CMD ["uvicorn", "main:app", "--host", "0.0.0.0", "--port", "8000"]
- Build the image with docker build -t fastapi-penguin-app .
- Run the container with docker run -d -p 8000:8000 fastapi-penguin-app
4.26 What are these weird port numbers?
- We map the Docker Host Port to the Application Port!
4.27 🔍 Example
4.28 🔍 Deploy container with CI/CD
name: Build and Push Docker Image

on:
  push:
    branches:
      - main

jobs:
  build:
    runs-on: ubuntu-latest

    steps:
      - name: Checkout code
        uses: actions/checkout@v3

      - name: Set up Docker Buildx
        uses: docker/setup-buildx-action@v3

      - name: Log in to Docker Hub
        uses: docker/login-action@v3
        with:
          username: ${{ secrets.DOCKER_HUB_USERNAME }}
          password: ${{ secrets.DOCKER_HUB_ACCESS_TOKEN }}

      - name: Build and push Docker image
        uses: docker/build-push-action@v4
        with:
          context: .
          push: true
          tags: ${{ secrets.DOCKER_HUB_USERNAME }}/fastapi-penguin-app:latest

      - name: Log out from Docker Hub
        run: docker logout
4.29 Presentation Layer over our API
4.30 ✏️ Your turn
4.31 Let’s Take a Break!